Instructions
1. Cast on 36 stitches.
2. Distribute the stitches to 4 double pointed knitting needles. Keep even numbers of stitches on each needle.
3. Begin the first row by hiding the other end of the yarn - knit 2 and purl 2, for 20 rounds, to make the ribbing for the mitten cuff.
4. Change the pattern. Knit all stitches for 15 rounds.
5. Make a space for the thumb by sliding 6 stitches on to a safety pin. Leave it for now, you will work on it later. Knit all the remaining sts to end of the round.
6. Make new 6 stitches to work the same number of sts.
7. Knit all 36 stitches for 30 rounds.
8. Start reducing a number of stitches by knitting two stitches together on each side of the mitten. Redistribute stitches on needles to make more convenient knitting.
9. Keep decreasing stitches - k2tog (knit two together) without making any intervals to last 4 sts; k4tog. Then pull the tail to inside of the mitten.
10. Secure and hide the end of the yarn.
11. Pick up 10 stitches for the thumb.
12. Knit all stitches for 15 rounds.
13. Decrease stitches - k2tog to end.
14. Pull the tail to inside of the thumb.
15. Secure and hide the end of the yarn.
For Аня М,
I decreased stitches as follows:
K17, K2tog, K16, K2tog,
K15, K2tog, K15, K2tog,
K14, K2tog, K14, K2tog,
K13, K2tog, K13, K2tog,
K12, K2tog, K12, K2tog,
K11, K2tog, K11, K2tog,
K10, K2tog, K10, K2tog,
K9, K2tog, K9, K2tog, k9
K2tog to last 4 sts; k4tog
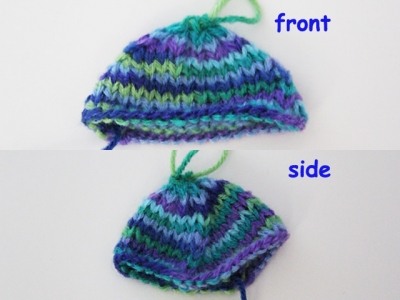
In the attached picture you may see the front of the mitten and its side. Hope this will help.


Thank you so, so much! I followed your instructions and this is the result i got. I quite like it but I think my mitten looks differently on the side, doesn't it?
It does look a little bit different, but very nice. The most important thing is that you like it. I've got the different outcome because I worked the decrease to the right. From the picture I see that you did the decrease to the left. As I've written earlier, there are many ways to decrease stitches. Happy knitting!
I'm so grateful for your comments! I find it a bit strange that my mitten looks differently than yours because I did decreases exactly as you did in the video - I just don't no any other way of decreasing stitches yet :)
Hi Anya Ru,
Please watch the video starting from about 13:31(you may pause it) to see that I insert my right working needle into the second stitch first and then into the first stitch, grab the yarn, and pull it through the two loops, resulting in the front post decrease to the right. I did not see how you do the decrease, but believe that you insert your working needle first into the back post of a first stitch and then into the second stitch, grab the yarn, and draw it through the two loops, resulting in the back post decrease to the left. For this pattern it doesn't really matter whether you will do a front post decrease or back post decrease, but some patterns will require you to do a certain decrease to get the right outcome.
Hi,
I'm wondering how long the mitten should be from the thumb hole? I'm knitting mine narrower (since I have small, slender hands), but I don't know where to start the decreasing? 30 rounds is too little. I'm a first time knitter.
Thank you,
Shamini
Hi Shamini,
After you knit to about the end of your pinky begin to decrease stitches. Happy knitting!
Thank you so much, Sana! :D I'll post a photo when I'm done with them.
Hi thanks for the pattern I'm a new knitter and i just wanted to try and make the mittens i wanted to ask when decreasing should i decrease on every needle as i go or just the front side and the back side
Hi Emmy,
You may read after the written instruction (For Аня М) how I decreased sts. Happy knitting!
Hello,
I am making this for 3 yr old. The hand measured 4.7 so I cast on 24 stitches. How many do I need to slip for the thumb, and cast on later? Does it stay the same as instructions or do I have to modify too. thanks !
Hi Mrmitten,
I would slip 4 sts for the thumb, and then created 4 new sts. Happy knitting!
Hi, I am sorry if this is a very silly question, but I have some sort of spacial dislexia, having trouble with the left hand mitten thumb position. At what point of the round should I leave the stitches in safety pin for the left hand?
Hi olgalami,
I distributed sts to 4 dpn. For each palm, I used 2 dpn. Work both mitten the same way to your thumb point.For the left mitten slide sts to a safety pin from the beginning of the first dpn, and for the right mitten slide sts to a safety pin from the end of the second dpn. Happy knitting!