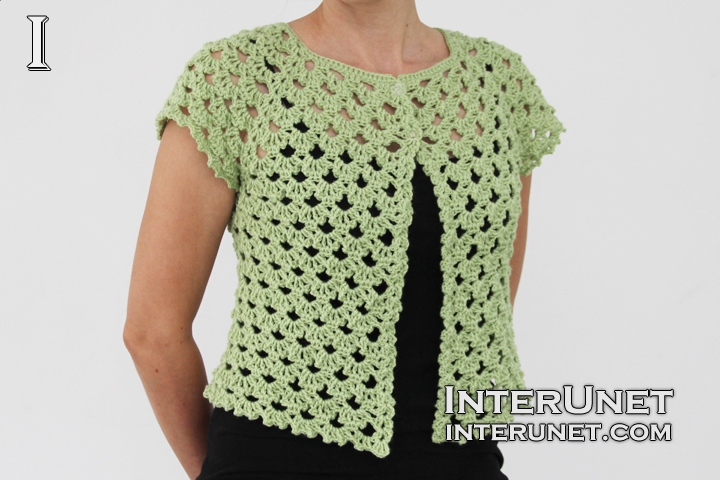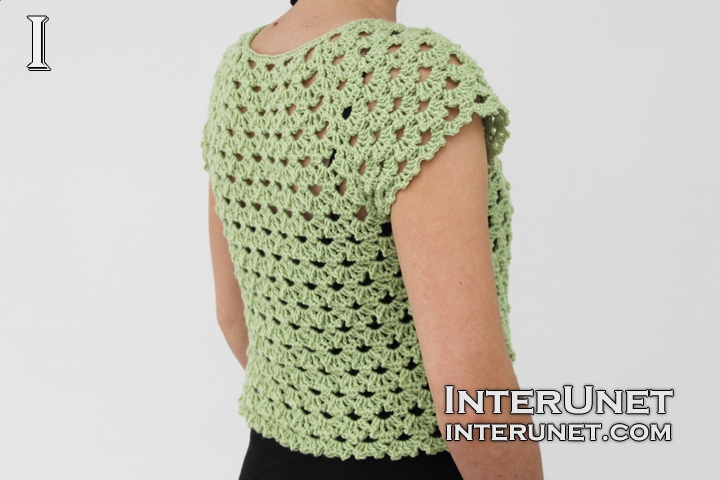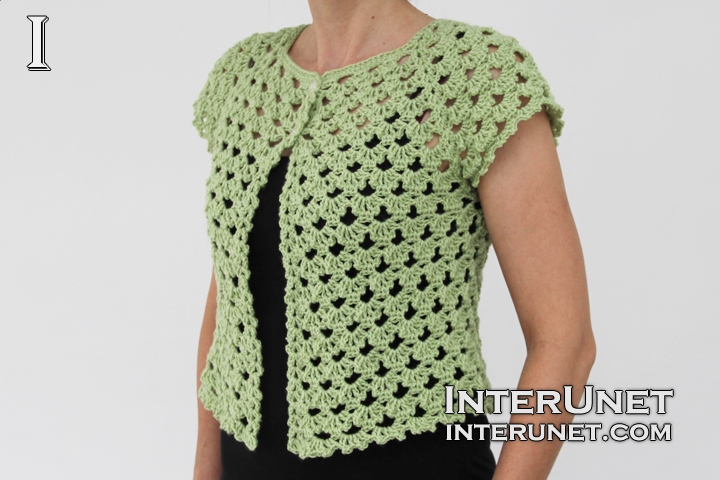
Yarn - Lion Brand Yarns Baby Soft (color : Sweet Pea) / light 3 / 5 oz (140 g) / 459 yd (420 m) / about 1.5 balls needed
Hook - E/4 – 3.50 mm or other size hook needed for the gauge
Gauge - Three flowers go into about 4 inches (10 cm)
Cardigan Size - XS - XXL
Complexity - Beginners friendly stitch

Jacket cardigan with short sleeves crochet pattern
Begin crocheting from the top to bottom.
Make a foundation chain of 60 chs (72 chs for size XXL).
Increase
1st row (wrong side) – h5ch, dc2 into 1ch, ch3, sk2, hdc3, [ch3, sk3, hdc3], ch3, sk2, corner1, ch3, sk2, hdc3, [ch3, sk3, hdc3] x 3, ch3, sk2, corner1, ch3, sk2, hdc3, [ch3, sk3, hdc3] x 3, ch3, sk2, (dc2, ch1, dc1) into 1ch, ch20*
1st row (size XXL) – h5ch, dc2 into 1ch, ch3, sk2, hdc3, [ch3, sk3, hdc3], ch3, sk2, corner1, ch3, sk2, hdc3, [ch3, sk3, hdc3] x 5, ch3, sk2, corner1, ch3, sk2, hdc3, [ch3, sk3, hdc3] x 3, ch3, sk2, (dc2, ch1, dc1) into 1ch, ch26*
*20 chs or multiples of 6 chs + 2 additional chs
2nd row (right side) – h2ch, sl.st. to last 2chs; (dc1, ch1, dc2) into corner, (flower1 into arch of 3 chs to corner; corner1 into corner) x 3, ch19**
2nd row (size XXL) – h2ch, sl.st. to last 2chs; (dc1, ch1, dc2) into corner, (flower1 into arch of 3 chs to corner; corner1 into corner) x 3, ch25**
**19 chs or mult. of 6 chs + 1 additional ch
3rd row – h4ch, (dc1, ch1, dc2) into 1ch, hdc3, [ch3, sk3, hdc3] x 2, ch3, corner1 into corner, ([ch3, hdc3 between picots] to corner; ch3, corner1 into corner) x 3, ch3, sk2, hdc3, [ch3, sk3, hdc3] x 2, shell1
4th row – h2ch, sl.st.1, sl.st.1 into shell, ch3, (dc1, ch1, dc2) into shell, [flower1 into arch of 3 chs to corner; corner1 into corner] to end
5th row – h2ch, sl.st.1, sl.st.1 into shell, ch3, (dc1, ch1, dc2) into shell, ([ch3, hdc3 between picots] to corner; ch3, corner1 into corner) to end
6th row – h2ch, sl.st.1, sl.st.1 into shell, (dc1, ch1, dc2) into shell, (Vst, picot1, dc2) into arch of 3chs, [flower1 into arch of 3 chs to corner; corner1 into corner] to last arch of 3chs;(dc2, picot1, Vst) into arch of 3chs, shell1 into shell
7th row – h2ch, sl.st.1, sl.st.1 into shell, (dc1, ch1, dc2) into shell, hdc3 between picots, ([ch3, hdc3 between picots] to corner; ch3, corner1 into corner) x 4, [ch3, hdc3 between picots] to shell; shell1 into shell
Repeat the pattern starting from the 4th row until your front and back parts will be wide enough to your chest circumference.
Work two more increase rows for sizes L, XL, and XXL before joining front and back parts together.
Join front and back parts together
16th row – h2ch, sl.st.1, sl.st.1 into shell, ch3, (dc1, ch1, dc2) into shell, [flower1 into arch of 3 chs to corner; (dc2, picot1, dc1, ch1) into corner, sk shoulder part, (dc1, picot1, dc2) into corner] x 2, flower1 into arch of 3 chs to shell; shell1 into shell
For size XXL, work [flower1 into arch of 3 chs to corner; (dc2, picot1, dc1, ch1) into corner, sk shoulder part, (dc1, picot1, dc2) into corner] x 2 just like for sizes S and L to work 34 flowers in total.
16th row (size M) - h2ch, sl.st.1, sl.st.1 into shell, ch3, (dc1, ch1, dc2) into shell, [flower1 into arch of 3 chs to corner; flower1 into corner, sk shoulder part, flower1 into corner] x 2, flower1 into arch of 3 chs to shell; shell1 into shell
For size XL, work one flower into each corner just like for the size M to crochet 32 flowers in total.
Flower pattern
17th row – h2ch, sl.st.1, sl.st.1 into shell, ch3, (dc1, ch1, dc2) into shell, (ch3, hdc3 between picots] to shell; ch3, shell1 into shell
18th row – h2ch, sl.st.1, sl.st.1 into shell, (dc1, ch1, dc2) into shell, (Vst, picot1, dc2) into arch of 3chs, flower1 into arch of 3 chs to last arch of 3chs;(dc2, picot1, Vst) into arch of 3chs, shell1 into shell
19th row – h2ch, sl.st.1, sl.st.1 into shell, (dc1, ch1, dc2) into shell, hdc3 between picots, [ch3, hdc3 between picots] to shell; shell1 into shell
20th row – h2ch, sl.st.1, sl.st.1 into shell, ch3, (dc1, ch1, dc2) into shell, flower1 into arch of 3 chs to shell; shell1 into shell
Repeat the pattern starting from the row 17 until you reach the desired length of the cardigan. Cut the yarn and secure it.
For sizes L, XL, XXL:
19th row = 19th row
20th row = 20th row
21st row = 17th row
22nd row = 18th row
Repeat the pattern starting from the 19th row.
Sleeves
Attach the yarn underarms, chain 3 to pick up the height, work flower1 into arch of 3 chs to end; dc1 + sl.st.1
Neck edge
Work hdc to end.
Buttons
Sew up 2 or more buttons.

Abbreviations
[ ] – repeat
ch – chain
corner/shell – (dc2, ch1, dc2) into one chain
dc – double crochet
flower – (dc2, picot1, Vst, picot1, dc2)
hdc – half double crochet
h#ch – insert a hook into the number/# chain from the hook
picot – make 2 chs, work sc1 into the first chain from the two chains
sc – single crochet
sk – skip a chain
sl.st. – slip stitch
Vst – V stitch – (d1, ch1, dc1) into 1ch
Short-sleeve cardigan jacket crochet pattern
Español
Hilo - Lion Brand Yarns Baby Soft (color : Sweet Pea) / light 3 / 5 oz (140 g) / 459 yd (420 m) / about 1.5 balls needed
Aguja de crochet - E/4 – 3.50 mm
Medida - tres flores en 4” (10 cm)
Tamaño - US 4 – 6
Instrucciones
Haz una cadena de 60 cadenas
Patrón
Aumentar
Fila 1 - inserte el gancho en la cinco cadena desde el gancho, punto alto 2 en 1 cadena, 3 cadenas, saltar en 2 cadenas, medio punto alto 3, [3 cadenas, saltar en 3 cadenas, medio punto alto 3], 3 cadenas, saltar en 2 cadenas, córner1, 3 cadenas, saltar en 2 cadenas, medio punto alto 3, [3 cadenas, saltar en 3 cadenas, medio punto alto 3] x 3, 3 cadenas, saltar en 2 cadenas, córner1, 3 cadenas, saltar en 2 cadenas, medio punto alto 3, [3 cadenas, saltar en 3 cadenas, medio punto alto 3] x 3, 3 cadenas, saltar en 2 cadenas, (punto alto 2, cadena1, punto alto1) en 1 cadena, cadenas20 o múltiplo de 6 +2
Fila 2 - inserte el gancho en la dos cadena desde el gancho, cadenetas para durar 2 cadenas; (punto alto 1, cadena1, punto alto2) en córner, (flor1 en 3 cadenas hasta córner; córner en córner) x 3, cadenas19 o múltiplo de 6 +1
Fila 3 - inserte el gancho en la cuatro cadena desde el gancho, (punto alto 1, cadena1, punto alto2) en 1 cadena, medio punto alto 3, [3 cadenas, saltar en 3 cadenas, medio punto alto 3] x 2, cadenas3, córner1 en córner, ([cadenas3, medio punto alto 3 entre dos picots] hasta córner; cadenas3, córner en córner) x 3, 3 cadenas, saltar en 2 cadenas, medio punto alto 3, [3 cadenas, saltar en 3 cadenas, medio punto alto 3] x 2, (punto alto 2, cadena1, punto alto2) en 1 cadena
Fila 4 - inserte el gancho en la dos cadena desde el gancho, cadenetas 2, cadenas3, (punto alto 1, cadena1, punto alto2) en coquille, [flor1 en 3 cadenas hasta córner; córner en córner] hasta terminar
Fila 5 - inserte el gancho en la dos cadena desde el gancho, cadenetas 2, cadenas3, (punto alto 1, cadena1, punto alto2) en coquille, ([cadenas3, medio punto alto 3 entre dos picots] hasta córner; cadenas3, córner1 en córner) hasta terminar
Fila 6 - inserte el gancho en la dos cadena desde el gancho, cadenetas 2, cadenas3, (punto alto 1, cadena1, punto alto2) en coquille, (punto alto 1, cadena1, punto alto1, picot1, punto alto2) en 3 cadenas, [flor1 en 3 cadenas hasta córner; córner en córner] hasta último 3 cadenas; (punto alto 2, picot1, punto alto1, cadena1, punto alto1) en 3 cadenas, coquille en coquille
Fila 7 - inserte el gancho en la dos cadena desde el gancho, cadenetas 2, cadenas3, (punto alto 1, cadena1, punto alto2) en coquille, medio punto alto 3 entre dos picots, ([cadenas3, medio punto alto 3 entre dos picots] hasta córner; cadenas3, córner1 en córner) x 4, [cadenas3, medio punto alto 3 entre dos picots] hasta coquille; coquille en coquille
Repetir el patrón comenzando Fila 4.
Unir
Fila 16 - inserte el gancho en la dos cadena desde el gancho, cadenetas 2, cadenas3, (punto alto 1, cadena1, punto alto2) en coquille, [flor1 en 3 cadenas hasta córner; (punto alto 2, picot1, punto alto1, cadena1) en córner, saltar parte de hombro, (punto alto 1, picot1, punto alto2) en córner] x 2, flor1 en 3 cadenas hasta coquille; coquille en coquille
Fila 17 - inserte el gancho en la dos cadena desde el gancho, cadenetas 2, cadenas3, (punto alto 1, cadena1, punto alto2) en coquille, (cadenas3, medio punto alto 3 entre dos picots] hasta coquille; cadenas 3, coquille en coquille
Fila 18 - inserte el gancho en la dos cadena desde el gancho, cadenetas 2, cadenas3, (punto alto 1, cadena1, punto alto2) en coquille, (punto alto 1, cadena1, punto alto1, picot1, punto alto2) en 3 cadenas, [flor1 en 3 cadenas hasta último 3 cadenas; (punto alto 2, picot1, punto alto1, cadena1, punto alto1) en 3 cadenas, coquille en coquille
Fila 19 - inserte el gancho en la dos cadena desde el gancho, cadenetas 2, cadenas3, (punto alto 1, cadena1, punto alto2) en coquille, medio punto alto 3 entre dos picots, [cadenas3, medio punto alto 3 entre dos picots] hasta coquille; coquille en coquille
Fila 20 - inserte el gancho en la dos cadena desde el gancho, cadenetas 2, cadenas3, (punto alto 1, cadena1, punto alto2) en coquille, flor1 en 3 cadenas hasta coquille; coquille en coquille
Repetir el patrón comenzando Fila 17.
Borde del cuello
Hacer medio punto alto hasta terminar.
[ ] - repetir
córner/coquille - (punto alto 2, cadena1, punto alto2) en 1 cadena
flor - punto alto 2, picot1, punto alto1, cadena1, punto alto1, picot1, punto alto2
Russian translation of the pattern by Sana - Crochet short sleeve top in Russian

Comments
Hi meeta,
Hi meeta,
The pattern without corners is multiples of 6 chs + 9 additional chs.
To check your gauge, make a foundation chain of about 21 chs.
1st row – h4ch, (dc1, ch1, dc2) into 1ch, hdc3, [ch3, hdc3] to last 1ch; shell1
2nd row – h2ch, sl.st.1, sl.st.1 into shell, ch3, (dc1, ch1, dc2) into shell, flower1 into arch of 3 chs to shell; shell1 into shell
3rd row – h2ch, sl.st.1, sl.st.1 into shell, ch3, (dc1, ch1, dc2) into shell, (ch3, hdc3 between picots] to shell; ch3, shell1 into shell
4th row – h2ch, sl.st.1, sl.st.1 into shell, (dc1, ch1, dc2) into shell, (Vst, picot1, dc2) into arch of 3chs, flower1 into arch of 3 chs to last arch of 3chs;(dc2, picot1, Vst) into arch of 3chs, shell1 into shell
5th row – h2ch, sl.st.1, sl.st.1 into shell, (dc1, ch1, dc2) into shell, hdc3 between picots, [ch3, hdc3 between picots] to shell; shell1 into shell
Repeat the pattern from the 2nd row.
Happy crochet!
Awesome work as always. What
Awesome work as always. What do I do if want a longer sleeve? Please help
Hi Rosy,
Hi Rosy,
I would work the 4 rows of the pattern without working first and last shells, and then join/seam sides together.
1st row – ch3, [flower1 into arch of 3 chs] to end; dc1 + RC6
2nd row – [hdc3 between picots, ch3] to end; dc1 + RC3
3rd row – (Vst, picot1, dc2) into arch of 3chs, [flower1 into arch of 3 chs] to last arch of 3chs;(dc2, picot1, Vst) into arch of 3chs, dc1 + RC3
4th row – hdc3 between picots, [ch3, hdc3 between picots] to end; dc1 + RC3
Happy crochet!
Thank you so much. I am
Thank you so much. I am making a big size. Hope I can make it!
Hi Sana
Hi Sana
I made this in long sleeves. Thank you very much for your tutorials. They are wonderful. What's your next project? Looking forward to it.
I love your long sleeve
I love your long sleeve version of the pattern. Thank you for sharing. Beautiful work. Congratulations!
This looks amazing! How did
This looks amazing! How did you manage the make the sleeves a longer? Thank you
Hi Manny,
Hi Manny,
I suggest you to watch this video https://youtu.be/HpHm-0hpZz4 from about 19:30 to see how I work a similar pattern in the round. The patterns are almost identical, but there I worked double crochets instead of half double crochets. Happy crochet!
Hi Sana, I’m doing a chain of
Hi Sana, I’m doing a chain of 60 however mine is coming up a lot smaller than what yours seems to be. I’m really stuck and confused can you help?? I’m using a DK weight yarn 100% acrylic as I can’t get the lions brand yarn needed here in the UK hook size 4mm. Thank you Manny
Hi Manny,
Hi Manny,
I suggest you to work more rows before joining back and front parts together. Measure your chest circumference. The length of the back and both front parts should be about the same or a little bit smaller than the length of your chest circumference. When your back and front parts will be wide enough for your chest circumference, join them together. Happy crochet!
Pages