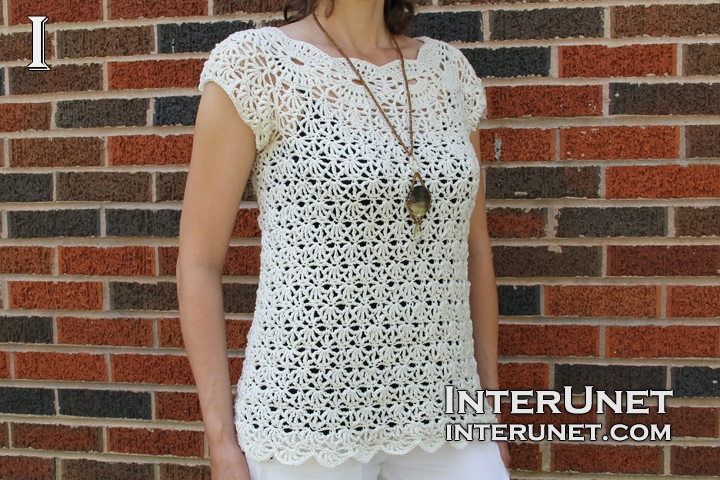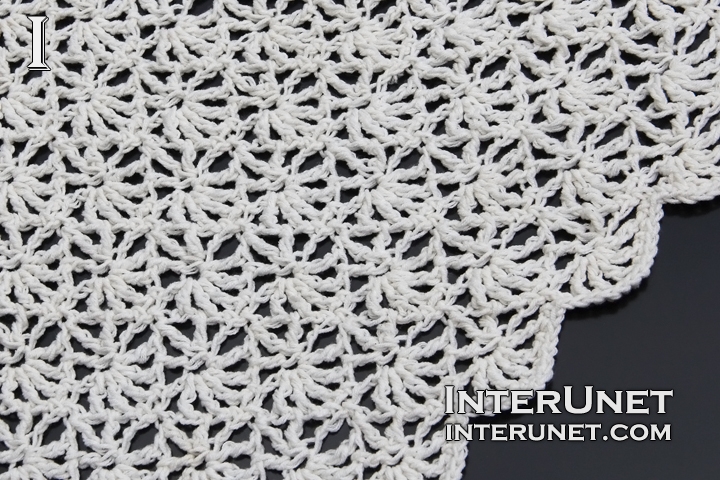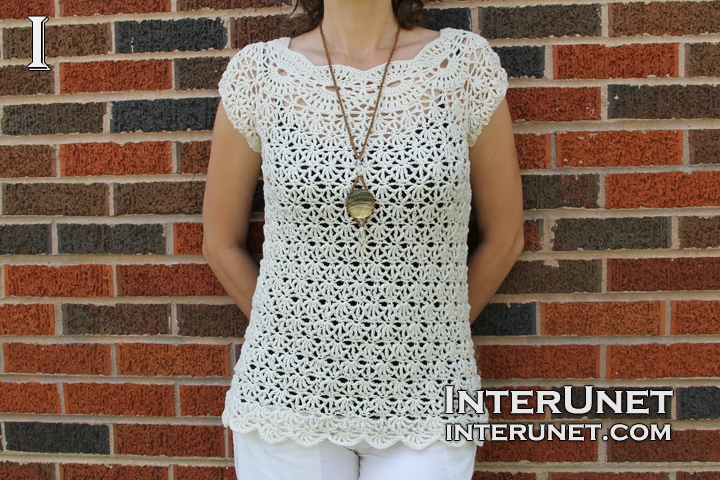
Yarn - Bernat Cotton-ish (cotton ball) / light 3/ 2.4 oz (70 g) / 282 yards (258 m) / about 3 balls needed
Hooks - E/4 – 3.50 mm, F/5 – 3.75 mm and G/6 4.25 mm or other size hooks needed for the gauge
Gauge - 2 repeats (jasmine st) go into about 3.5 inches (9 cm)
Top Size - S/M
Complexity - Advanced beginner

Blouse crochet pattern – white jasmine stitch
Row-by-row crochet instructions
Part 1 video tutorial
Begin crocheting the blouse from the top to bottom.
Make a foundation chain of 161 chs or multiples of 32 chs plus 1 additional ch.
1st round – ch4, sk2, sc1, ch4, sk2, sc1, ch5, sk3, sc1, ch4, sk2, sc1, ch3, sk2, [sc1, ch3, sk2, sc1, ch4, sk2, sc1, ch5, sk3, sc1, ch4, sk2, sc1, ch3, sk2] to end + sl.st.1 into 1st ch
2nd round – ch4, dc1 into sm.ch, ch3, sc1 under arch of 4chs, dc9 under arch of 5chs, sc1 under arch of 4chs, ch3, [Vst1 between two arches of 3chs above sc ch, ch3, sc1 under arch of 4chs, dc9 under arch of 5chs, sc1 under arch of 4chs, ch3] to end + sl.st.1 into 3rd ch
3rd round – ch2, sc1 under ch, (ch1, dc1) x 9 above dc9 of prev.round, ch1, [(sc1, ch2, sc1) into Vst under ch, (ch1, dc1) x 9 above dc9 of prev.round, ch1] to end + sl.st.1 into chs
4th round – ch2, sk2, (dc CL1, ch1) x 9, [sc1 under arch of 2chs, ch1, sk2, (dc CL1, ch1) x 9] to end + sl.st.1 into 1st ch
Back part
1st row – (ch1, sk1, sl.st.1) x 4, ch3, sk3, sc1, [ch3, sc1 under ch between 7th and 8th dc CL, ch3, trc dec1, ch3, sc1 under ch between 2nd and 3rd dc CL, ch3, sk2, sc1, ch3, sk3, sc1] x 3 + RC3
2nd row – h4ch, dc1, [ch1, sk3, Vst1] to last 4chs; ch1, sk3, dc2 into 1ch + RC5
Jasmine stitch
3rd row – h6ch, (trc1, ch1) x 2 into sm.ch, sk3, sc1, [ch1, sk3, shell1, sk3, sc1] to last 4chs; ch1, sk3, (trc1, ch1) x 3 into 1ch + RC1
4th row – h2ch, sc1, sc1 under ch, ch2, trc dec1*, ch2, [sc1 under ch, ch1, sk1, sc1 under ch, ch2, trc dec1*, ch2] to last 3chs; sk1, sc2 + RC1
5th row – h2ch, sc1, [ch1, sk3, shell1, sk3, sc1] to end + RC3
6th row – trc1 under ch between 1st and 2nd trc sts, ch2, sc1 under ch, ch1, sk1, sc1 under ch, ch2, [trc dec1*, ch2, sc1 under ch, ch1, sk1, sc1 under ch, ch2] to last 5chs; trc dec** + RC5
Repeat the pattern starting from the 3rd row
7th row = 3rd row
8th row = 4th row, but at the end of the row chain 19 (for the size XS – chain 9 and for the size L – chain 29) instead of RC1

Part 2 video tutorial
Front part
Skip one repeat/arch from the back part and attach the yarn between 3rd and 4th dc clusters.
1st row (right side) – sc1, ch3, sk3, [sc1, ch3, sc1 under ch between 7th and 8th dc CL, ch3, trc dec1, ch3, sc1 under ch between 2nd and 3rd dc CL, ch3, sk2, sc1, ch3, sk3, sc1] x 3 + RC3
2nd row (wrong side) – h4ch, dc1, [ch1, sk3, Vst1] to last 4chs; ch1, sk3, dc2 into 1ch + RC1
3rd row = 5th row (back part)
4th row = 6th row (back part)
5th row = 3rd row (back part)
Join the back and front parts together
Slip a last loop of the 5th row (front part) on the crochet hook. You should have 2 loops on your hook.
6th row (wrong side) - sc1 into ch above trc ch of prev.row, sc1 under ch, ch2, trc dec1*, ch2, [sc1 under ch, ch1, sk1, sc1 under ch, ch2, trc dec1*, ch2] to last 3chs; sk1, sc2 + ch19 (for the size XS – ch9 and for the size L – ch29)
Join front and back parts into a ring with the slip stich into the 1st sc ch. Turn the work to the right side of the garment.
Body
1st round – ch1, (ch1, sk4, shell1, sk4, sc1) x 2, [ch1, sk3, shell1, sk3, sc1] x 8 or to underarm, (ch1, sk4, shell1, sk4, sc1) x 2, [ch1, sk3, shell1, sk3, sc1] x 7, ch1, sk3, shell1, sk3 + sl.st.1 into 1st ch
2nd round – ch3, trc1 under ch between 1st and 2nd trc sts, ch2, sc1 under ch, ch1, sk1, sc1 under ch, ch2, [trc dec1*, ch2, sc1 under ch, ch1, sk1, sc1 under ch, ch2] to end; work unfinished trc under ch + sl.st.1 into 4th ch
3rd round – ch5, (trc1, ch1) x 2 into sm.ch, sk3, sc1, [ch1, sk3, shell1, sk3, sc1] to last 4chs; ch1, sk3, (trc1, ch1) x 2 into 1ch + sl.st.1 into 4th ch
4th round – ch2, sc1 under ch, ch2, trc dec1*, ch2, [sc1 under ch, ch1, sk1, sc1 under ch, ch2, trc dec1*, ch2] to end; sc1 under ch + sl.st.1 under 2chs
5th round – ch1, [ch1, sk3, shell1, sk3, sc1] to last repeat; ch1, sk3, shell1, sk3 + sl.st.1 into 1st ch
Repeat the pattern starting from the 2nd round until you crochet to about your waistline, and then use a larger size crochet hook (G) to widen the garment from the bottom.
Neckline
Attach the yarn to the initial foundation chain and work 4 chains to pick up the height of the 1st round.
1st round – ch4, dc1 into sm.ch, ch3, sk2, sc1, dc7 under arch of 3chs, sk2, sc1, ch3, sk2, [Vst1, ch3, sk2, sc1, dc7 under arch of 3chs, sk2, sc1, ch3, sk2] to end + sl.st.1 into 3rd ch
Use a smaller size crochet hook (E)
2nd round – ch2, sc1 under ch, (ch1, dc1) x 7 above dc7 of prev.round, ch1, [(sc1, ch2, sc1) into Vst under ch, (ch1, dc1) x 7 above dc7 of prev.round, ch1] to end + sl.st.1 into chs
3rd round – ch2, sk2, (dc CL1, ch1) x 7, [sc1 under arch of 2chs, ch1, sk2, (dc CL1, ch1) x 7] to end + sl.st.1 into 1st ch
Sleeves
Attach the yarn underarm
1st round – ch4, [sk interval*, sc1, ch3] to 4th round; sc1 under ch between 7th and 8th dc CL, ch3, trc dec1, ch3, sc1 under ch between 2nd and 3rd dc CL, ch3, sk2, sc1, ch3, sk3, sc1, ch3, sc1 under ch between 7th and 8th dc CL, ch3, trc dec1, ch3, sc1 under ch between 2nd and 3rd dc CL, ch3, [sk interval*, sc1, ch3] to end + sl.st.1 into 1st ch
At the end of the 1st round, you should have 18 arches of 3 chs or multiples of 2 arches.
2nd round – ch4, dc1, [ch1, sk3, Vst1] to last 3chs; ch1, sk3 + sl.st.1 into 3rd ch
3rd round – sc1, ch1, sk3, shell1, [sk3, sc1, ch1, sk3, shell1] to end + sl.st.1 above 1st sc ch
4th round = 2nd round (body)
5th round = 3rd round (body)
Decrease
6th round – ch2, sc1 under ch, ch1, trc dec1*, ch1, [sc1 under ch, ch1, sk1, sc1 under ch, ch1, trc dec1*, ch1] to end; sc1 under ch + sl.st.1 under 2chs
Edges
sc to end

Abbreviations
ch – chain
dc – double crochet
dc CL – double crochet cluster – work 2 unfinished dc and pull the yarn through the 3 loops on the hook
h#ch – insert a hook into the # chain from the hook
RC – returning chain
sc – single crochet
shell – (trc1, ch1) x 5 into 1ch
sk – skip a chain
sk interval – skip an interval of about 3 or 4 chains
sm.ch – same base chain
st – stitch
trc dec – triple crochet decrease – work unfinished trc above 9th dc CL, sk3, unfinished trc above 1st dc CL, and draw the yarn through 3 loops on the hook
*trc dec – work unfinished trc under ch, unfinished trc above sc ch, unfinished trc under ch, and then pull the yarn through all 4 loops on the hook
**trc dec – sk1, unfinished trc1, sk2, unfinished trc1, pull the yarn through 3 loops on the hook
Vst – V stitch – (dc1, ch1, dc1) into one chain
Sleeveless pullover crochet pattern – white jasmine blouse

Comments
You're welcome, Meeta. I'm
You're welcome, Meeta. I'm glad that your top turned out beautiful. Congratulations! You are a very hard working person. Happy crochet!
Hello mam,
Hello mam,
I completed the top except for sleeves.
My arm hole width is 14 inches and arm width is 10 inches. So I want sleeves width to me max 12 inches.
But my sleeves width is 16 inches and I am getting 22 arches.
I think I need to reduce arches to 16. I will increase the length of sleeves. That I can do.
Can you help to show how to reduce the arches. Please. Attached photo.
Beautiful pattern. What size
Beautiful pattern. What size needle and yarn did you recommend?
Hi Lindaewald,
Hi Lindaewald,
The info about the yarn, hook, and more you may find at the top of this page below the very first picture. Happy crochet!
Dear mam, here is my finished
Dear mam, here is my finished top I have worn to office today.bi received lot of appreciation for the top. Thank you for your help and guidance.
Hi Meeta,
Hi Meeta,
Thank you for modeling your project. I appreciate it. Your work is beautiful and accurate as always. You've written something about your sleeves, but they look perfect on the picture. Happy crochet!
hi sana , this is sri,
hi sana , this is sri,
please advise me iwana make this dress this type of yarn please advise me ,this is crochet thread how many stiches taken and how much yarn for large size dress. please advise me thank you
sri.
Hi Sri,
Hi Sri,
As I wrote you before, it is necessary to check your gauge. Different crocheters produce different gauge using the same yarn and hook.
Hi! Thank you for the great
Hi! Thank you for the great tutorial, I really like your videos, they are easy to follow and clear. I have done the attached summer top with 1.5 mm hook, I needed 225 chains to start.
Hi Milli05,
Hi Milli05,
And I really like your work and crochet blouse. It looks beautiful. Congratulations! Thank you for sharing your crochet project with us. I appreciate it.
Pages