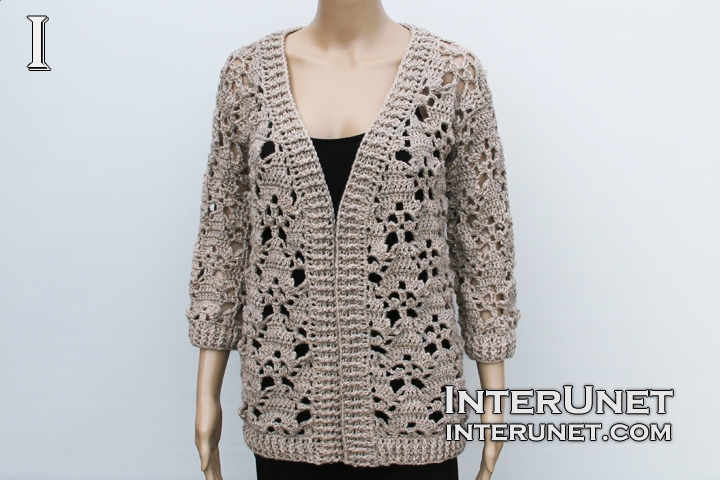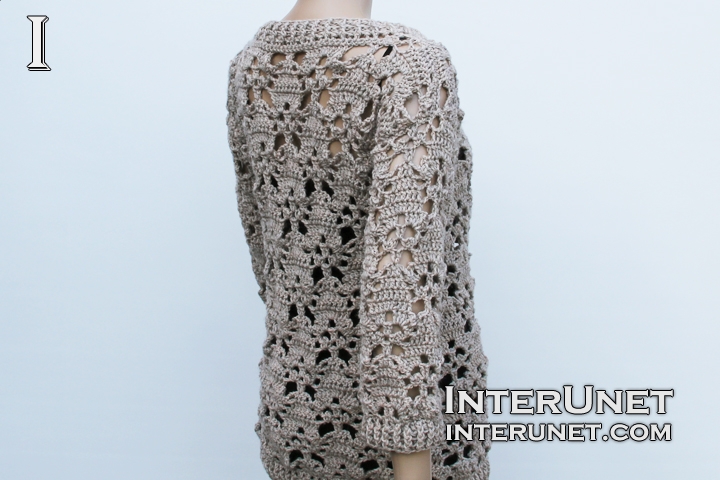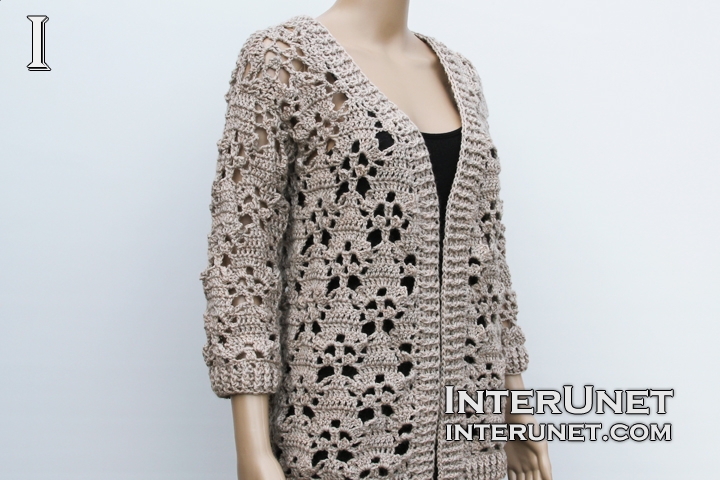
Yarn - Partons Classic Wool (color – natural mix) / worsted 4/ Net Weight – 3.5 oz (100 g) / 210 yds (192 m) / about 5 balls needed
Hooks - I/9 - 5.5 mm or other size hook needed for the gauge
Cardigan Size - US 6
Gauge - One repeat is about 4.25 inches (10.8 cm)
Complexity - Advanced beginner / Intermediate

Lace cardigan jacket crochet pattern
Step-by-step crochet instructions
Part 1 video tutorial
Begin crocheting the jacket from the bottom to top.
Make a foundation chain of 141 chs or multiples of 17 chs plus 5 additional chains.
1st row (right side) – h5ch, dc2, ch3, sk2, sc1, ch3, sk2, dc2, ch3, sk2, sc1, ch3, sk2, [dc5, ch3, sk2, sc1, ch3, sk2, dc2, ch3, sk2, sc1, ch3, sk2] to last 3 chs; dc3 + RC3
2nd row (wrong side) – h5ch, dc1, ch3, sk2, sc1, (dc2, picot1, dc3) under arch of 3 chs, ch2, sk2, (dc3, picot1, dc2) under arch of 3 chs, sc1 into 2nd ch of arch of 3 chs, ch3, sk2, [dc3, ch3, sk2, sc1, (dc2, picot1, dc3) under arch of 3 chs, ch2, sk2, (dc3, picot1, dc2) under arch of 3 chs, sc1 into 2nd ch of arch of 3 chs, ch3, sk2] to last 2 chs; dc2 + RC6
3rd row – [sk picot, dc3 above dc3 of prev.row, dc3 into arch of 2 chs, dc3 above dc3 of prev.row, ch3, dc2 into 1 ch above 2nd dc of 3 dc of prev.row, ch3] to end; dc1 into last ch + RC1
4th row – h2ch, sc2, picot1, sc1, ch3, sk2, dc7, ch3, sk2, sc1, picot1, sc1, [ch2, sk2, sc1, picot1, sc1, ch3, sk2, dc7, ch3, sk2, sc1, picot1, sc1] to last 1ch; sc1 + RC6
5th row – sk picot, sc1 into 2nd ch of arch of 3 chs, ch3, sk2, dc5, ch3, sk2, sc1, ch3, sk picot, [dc2 into arch of 2 chs, ch3, sk picot, sc1 into 2nd ch of arch of 3 chs, ch3, sk2, dc5, ch3, sk2, sc1, ch3, sk picot] to end; dc1 into last ch + RC4
6th row – (dc3, picot1, dc2) into arch of 3 chs, sc1 into 2nd ch of arch of 3 chs, ch3, sk2, dc3, ch3, sk2, sc1, (dc2, picot1, dc3) under arch of 3 chs, [ch2, sk2, (dc3, picot1, dc2) into arch of 3 chs, sc1 into 2nd ch of arch of 3 chs, ch3, sk2, dc3, ch3, sk2, sc1, (dc2, picot1, dc3) under arch of 3 chs] to end; ch1, dc1 into last ch + RC3
7th row – dc1 under 1 ch, dc3 above dc3 of prev.row, ch3, sk picot, dc2 into 1 ch above 2nd dc of 3 dc of prev.row, ch3, sk picot, [dc3 above dc3 of prev.row, dc3 into arch of 2 chs, dc3 above dc3 of prev.row, ch3, sk picot, dc2 into 1ch above 2nd dc of 3 dc of prev.row, ch3, sk picot] to end; dc5 + RC3
8th row – h5ch, dc3, ch3, sk2, sc1, picot1, sc1, ch2, sk2, sc1, picot1, sc1, ch3, sk2, [dc7, ch3, sk2, sc1, picot1, sc1, ch2, sk2, sc1, picot1, sc1, ch3, sk2] to last 4 chs; dc4 + RC3
9th row – h5ch, dc2, ch3, sk2, sc1, ch3, dc2 into arch of 3 chs, ch3, sc1 into 2nd ch of arch of 3 chs, ch3, sk2, [dc5, ch3, sk2, sc1, ch3, dc2 into arch of 3 chs, ch3, sc1 into 2nd ch of arch of 3 chs, ch3, sk2] to last 3 chs; dc3 + RC3
Repeat the pattern starting from the 2nd row.

Part 2 video tutorial
After you crochet 25 rows of the pattern or repeat the eight rows of the stitch three times, begin crocheting the pattern decreasing chains from each side of a row.
25th row = 9th row, but work RC2
26th row – h4ch, dc1, ch3, sk2, sc1, (dc2, picot1, dc3) under arch of 3 chs, ch2, sk2, (dc2, picot1, dc3) under arch of 3 chs, sc1 into 2nd ch of arch of 3 chs, ch3, sk2, [dc3, ch3, sk2, sc1, (dc2, picot1, dc3) under arch of 3 chs, ch2, sk2, (dc2, picot1, dc3) under arch of 3 chs, sc1 into 2nd ch of arch of 3 chs, ch3, sk2] to last 2 chs; dc dec1 + RC3
27th row – [sk picot, dc3 above dc3 of prev.row, dc3 into arch of 2 chs, dc3 above dc3 of prev.row, ch3, dc2 into 1 ch above 2nd dc of 3 dc of prev.row, ch3] to last repeat; sk picot, dc3 above dc3 of prev.row, dc3 into arch of 2 chs, dc3 above dc3 of prev.row, dc1 into last ch + RC3
28th row – h6ch, dc7, [ch3, sk2, sc1, picot1, sc1, ch2, sk2, sc1, picot1, sc1, ch3, sk2, dc7] to last 2chs; sk1, dc1 + RC3
29th row – h6ch, dc5, [ch3, sk2, sc1, ch3, sk picot, dc2 into arch of 2 chs, ch3, sk picot, sc1 into 2nd ch of arch of 3 chs, ch3, sk2, dc5] to last 2chs; sk1, dc1 + RC3
30th row – h6ch, dc3, [ch3, sk2, sc1, (dc2, picot1, dc3) under arch of 3 chs, ch2, sk2, (dc3, picot1, dc2) into arch of 3 chs, sc1 into 2nd ch of arch of 3 chs, ch3, sk2, dc3] to last 2chs; sk1, dc1 + RC3
31st row – h6ch, dc1, ch3, sk picot, dc3 above dc3 of prev.row, dc3 into arch of 2 chs, dc3 above dc3 of prev.row, ch3, sk picot, [dc2 into 1ch above 2nd dc of 3 dc of prev.row, ch3, sk picot, dc3 above dc3 of prev.row, dc3 into arch of 2 chs, dc3 above dc3 of prev.row, ch3, sk picot] to end; dc1 above 2nd dc of 3 dc of prev.row, sk1, dc1
First front part
32nd row – h2ch, sc2, picot1, sc1, ch3, sk2, [dc7, ch3, sk2, sc1, picot1, sc1, ch2, sk2, sc1, picot1, sc1, ch3, sk2] to last 4 chs; dc4 + RC3
33rd row – h5ch, dc2, ch3, sk2, sc1, [ch3, dc2 into arch of 3 chs, ch3, sc1 into 2nd ch of arch of 3 chs, ch3, sk2, dc5, ch3, sk2, sc1] to end; dc1 into last ch + RC3
34th row – sc1 into 2nd ch of arch of 3chs, ch3, sk2, [dc3, ch3, sk2, sc1, (dc2, picot1, dc3) under arch of 3 chs, ch2, sk2, (dc2, picot1, dc3) under arch of 3 chs, sc1 into 2nd ch of arch of 3 chs, ch3, sk2] to last 2 chs; dc2 + RC6
35th row - sk picot, dc3 above dc3 of prev.row, dc3 into arch of 2 chs, dc3 above dc3 of prev.row, ch3, dc dec1* + RC1
*dc dec - work unfinished dc into 2nd dc of 3 dc of prev.row, sk1, work unfinished dc and draw the yarn through remaining 3 loops on your hook.
36th row = 4th row
37th row = 5th row
38th row = 6th row
39th row = 7th row
40th row = 8th row
41st row = 9th row
42nd row = 2nd row
43rd row = 3rd row
Back part
Attach the yarn above 5th dc of 9 dc of prev.row and ch3 to pick up the height. Crochet the 32nd row as your 8th row working 4 repeats.
Then repeat the 8 rows of the pattern starting from the 9th row until you crochet 12 rows in total.
Back shoulder parts
Crochet 2 rows working one repeat.
Then join back and front shoulder pieces together.
Slip stitch down to your 43rd row of the back part, then sc to your last one repeat and crochet 2 rows for the second back shoulder part.
Second front part
Begin crocheting your 2nd front part the same as your back part. Attach the yarn into 5th ch of 9 dc of prev.row (reuse last used ch), then ch3 to pick up the height.
32nd row – dc3, ch3, sk2, sc1, picot1, sc1, [ch2, sk2, sc1, picot1, sc1, ch3, sk2, dc7, ch3, sk2, sc1, picot1, sc1], sk1, sc1 + RC3
33rd row – sc1 into 2nd ch of arch of 3 chs, ch3, sk2, [dc5, ch3, sk2, sc1, ch3, dc2 into arch of 3 chs, ch3, sc1 into 2nd ch of arch of 3 chs, ch3, sk2] to last 3 chs; dc3 + RC3
34th row – h5ch, dc1, [ch3, sk2, sc1, (dc2, picot1, dc3) under arch of 3 chs, ch2, sk2, (dc2, picot1, dc3) under arch of 3 chs, sc1 into 2nd ch of arch of 3 chs, ch3, sk2, dc3], sk1, dc1 + RC2
35th row – h5ch, dc1, ch3, sk picot, dc3 above dc3 of prev.row, dc3 into arch of 2 chs, dc3 above dc3 of prev.row, ch3, dc1 into last ch + RC1
Continue crocheting the 8 rows of the pattern without decreasing chains until you crochet 12 rows in total.
Join front and back shoulder pieces together.
Sleeves
Make a foundation chain of 52 chs or multiples of 17 chs plus 1 additional ch. Then join it into a ring with the slip stitch.
1st round – ch3, dc2, ch3, sc1, ch3, sk2, dc2, ch3, sk2, sc1, ch3, sk2, [dc5, ch3, sk2, sc1, ch3, sk2, dc2, ch3,sk2, sc1, ch3, sk2] to last 2chs; dc2 + sl.st.1 into 3rd ch.
2nd round – ch3, dc1, ch3, sk2, sc1, (dc2, picot1, dc3) under arch of 3 chs, ch2, sk2, (dc2, picot1, dc3) under arch of 3 chs, sc1 into 2nd ch of arch of 3 chs, ch3, sk2, [dc3, ch3, sk2, sc1, (dc2, picot1, dc3) under arch of 3 chs, ch2, sk2, (dc2, picot1, dc3) under arch of 3 chs, sc1 into 2nd ch of arch of 3 chs, ch3, sk2] to last 1 ch; dc1 + sl.st.1 into 3rd ch.
3rd round – ch6, sk picot, dc3 above dc3 of prev.row, dc3 into arch of 2 chs, dc3 above dc3 of prev.row, ch3, [dc2 into 1 ch above 2nd dc of 3 dc of prev.row, ch3, sk picot, dc3 above dc3 of prev.row, dc3 into arch of 2 chs, dc3 above dc3 of prev.row, ch3] to end; dc1 into last ch + sl.st.1 into 3rd ch.
4th round – ch2, [sc1, picot1, sc1, ch3, sk2, dc7, ch3, sk2, sc1, picot1, sc1, ch2, sk2] to end + sl.st.1 into 2nd ch.
5th round – ch6, sk picot, sc1 into 2nd ch of arch of 3 chs, ch3, sk2, dc5, ch3, sk2, sc1, ch3, sk picot, [dc2 into arch of 2 chs, ch3, sk picot, sc1 into 2nd ch of arch of 3 chs, ch3, sk2, dc5, ch3, sk2, sc1, ch3, sk picot] to end; dc1 into arch of 2chs + sl.st.1 into 3rd ch.
6th round – ch4, (dc3, picot1, dc2) into arch of 3 chs, sc1 into 2nd ch of arch of 3 chs, ch3, sk2, dc3, ch3, sk2, sc1, (dc2, picot1, dc3) under arch of 3 chs, [ch2, sk2, (dc3, picot1, dc2) into arch of 3 chs, sc1 into 2nd ch of arch of 3 chs, ch3, sk2, dc3, ch3, sk2, sc1, (dc2, picot1, dc3) under arch of 3 chs] to end; ch1 + sl.st.1 into 3rd ch.
7th round – ch3, dc1 under 1 ch, dc3 above dc3 of prev.row, ch3, sk picot, dc2 into 1 ch above 2nd dc of 3 dc of prev.row, ch3, sk picot, [dc3 above dc3 of prev.row, dc3 into arch of 2 chs, dc3 above dc3 of prev.row, ch3, sk picot, dc2 into 1ch above 2nd dc of 3 dc of prev.row, ch3, sk picot] to last 4 chs; dc4 + sl.st.1 into 3rd ch.
8th round – ch3, dc3, ch3, sk2, sc1, picot1, sc1, ch2, sk2, sc1, picot1, sc1, ch3, sk2, [dc7, ch3, sk2, sc1, picot1, sc1, ch2, sk2, sc1, picot1, sc1, ch3, sk2] to last 3 chs; dc3 + sl.st.1 into 3rd ch.
9th round – ch3, dc2, ch3, sk2, sc1, ch3, dc2 into arch of 3 chs, ch3, sc1 into 2nd ch of arch of 3 chs, ch3, sk2, [dc5, ch3, sk2, sc1, ch3, dc2 into arch of 3 chs, ch3, sc1 into 2nd ch of arch of 3 chs, ch3, sk2] to last 2 chs; dc2 + sl.st.1 into 3rd ch.
Repeat the pattern starting from the 2nd round using a larger size crochet hook to widen the top of sleeves.
Join sleeves into the garment.
Sleeve edge
Attach the yarn to the initial foundation chain of a sleeve and work dc decreasing some chs.
1st round – ch3, dc2, sk1, [dc3, sk1] to end + sl.st.1 into 3rd ch.
2nd round – ch3, [fp dc1, bp dc1] to end + sl.st.1 into 3rd ch.
Repeat the 2nd round.
Bottom edge
Attach the yarn to the initial foundation chain of the body and ch3 to pick up the height.
1st row (wrong side) – dc to end + RC3
2nd row (right side) – [fp dc1, bp dc1] to end + RC3
Repeat the 2nd row.
Body edge work similar to the bottom edge, but decrease some chains from the back of your neckline while crocheting your first dc row.

Abbreviations
[ ] – repeat
bp dc – back post double crochet
ch – chain
dc – double crochet
dc dec – double crochet decrease
fp dc – front post double crochet
h#ch – insert a hook into the # ch from your hook
prev.row – previous row
RC – returning chain
sc – single crochet
sk – skip a chain
Lace sweater cardigan – jacket with sleeves crochet pattern

Comments
Hi Luz,
Hi Luz,
Yes, you may add few more rows on the back part or add 2 rows on the back part and one row on the front parts (if possible).
Hi Sana, I'm having trouble
Hi Sana, I'm having trouble of how to make my backpart a little bit tighter. I tried it after I joined the shoulder part and it came loosely at the back neck I can see there's a gap. I really don't want to frag it, so now I'm doing the edges, first I did dc round and skip 1 chain. Do you have an idea of how to make the back neck a little tighter? Pls. advise. Thanks.
Hi Luz,
Hi Luz,
You may read the very last sentence of the written instruction to decrease some chs from the back side of the neck while working the very first row of dc. I do not see the gap. You may attach a picture, so I could see it too.
I did skip some dc before I
I did skip some dc before I did the edges , maybe I need to decrease more dc. I attached a picture if you can see I folded the one I want to make it more smaller.
To make it clearly, I folded
To make it clearly, I folded the gap because when I wear it's loose on the back neck.
You probably cut the yarn off
You probably cut the yarn off by now. So, I would suggest to attach the main yarn and work one sc or sl.st row for the back neck part only decreasing some chs. Then you decrease more chs when you'll crochet the edge. That should fix the problem.
I also see that you decreased some chs while working the bottom edge. I'm not sure whether you wanted it to be that way. I did not decrease chs there.
Hi Sana, yes I did decrease
Hi Sana, yes I did decrease the bottom. That's why it doesn't look like a jacket. I will frag the borders and start again.when you say decrease more at the edges, is that means, the front all the way up on back neck that I will do decreases? And the bottom there's no decreases? Did I understand it correctly ? Thanks.
I decreased chs from the back
I decreased chs from the back of the neckline only. I did not decrease chs from the front of the cardigan. Please read Bottom Edge at the very end of the written instruction. For the very first row, I just dc to end. Happy crochet!
Hi Sana, thank you for your
Hi Sana, thank you for your advise of how to decrease the back, I was able to finish it. And I ran out yarn again , do not have enough to make long sleeves. I would love to have long sleeves maybe I'll make another one.
Hi Luz,
Hi Luz,
I'm glad that you were able to finish your work. It looks beautiful. I love the yarn color combination. Congratulation!
Pages