 |
 |
 |
 |
Knitting is an art that requires some practice and patience. It has its own language which might not be understandable for the first time user. Therefore, it is recommended to familiarize yourself with the knitting language at least a little bit before getting started any of your projects.
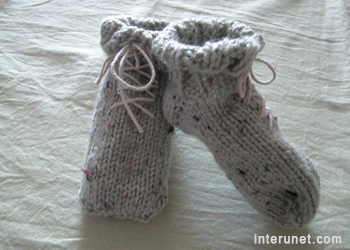
In the example were used the common top-down technique of knitting a sock. This technique is meant to start the knitting process from the top (the cuff) and work down to the toe. This is a very simple way of making kids socks, but not only one existing.
Step by step instruction
Step #1
decide on your yarn
Remember, however, that the quantity of yarn and its thickness will affect the socks’ look and coziness. You will knit socks faster by choosing the thick yarn. On the other hand, the thicker the yarn the less likely your child will be comfortable in the socks unless you do it with purpose of using them outside as shoes (booties). It is also recommended to choose soft yarn for your child’s sensitive skin. Usually it doesn’t really matter whether you choose new or used yarn. You can even use the yarn from your other knitting projects. In the example the used yarn were used.
Step #2
take measurements
Measure the circumference of your child’s cuff and length of his foot. Then turn the inches (centimeters) into numbers of stitches you need. You need to calculate how many stitches will go into one inch or centimeter and then multiply the number by total amount of inches or centimeters needed. To make your calculations more accurate, you need to pay attention to the chosen yarn as well. Keep in mind that some yarns are stretchier than others. Therefore, you might decide to reduce this number by about 5%. For knitting kids socks the reduction not supposed to be significant regardless of the yarn type because your child’s feet grow fast anyway. Other thing that you need to keep in mind is your knitting style. If you knit very tight with thin needles it will reduce somewhat the socks stretchiness and you might not need to make any reductions in your calculations at all. Record all numbers on the paper because you will need them for the second sock.
Step #3
cast on the desired number of stitches
You should make as many stitches as you need according to your measurements. If you are new to knitting please see how to cast on. In the given example 30 stitches were used initially and then reduced to 28. (Hint: keep your numbers even and dividable by 4).
Step #4
get rid of the other end of the yarn (optional)
When you start your first row you need to use both the ball end and other end of the yarn. You may leave the tail of the yarn as a marker for the starting point and weave it later.
Step #5
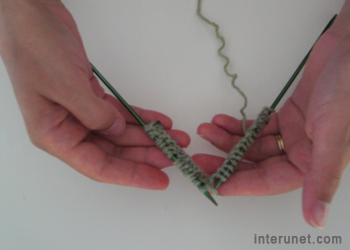
knit the first row
On the right side you need to purl 2 stitches and then knit 2 stitches.
Step #6
rows - 2 through 6
On the wrong side slip the first stitch and then knit and purl wherever you should. For example, if on the right side you knitted two stitches then on the wrong side you should purl them instead. Repeat the process till the end. (This is actually an optional step because you could start now from dividing the stitches to four knitting needles).
Step #7
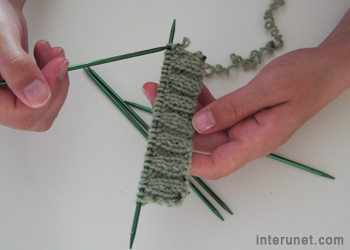
divide numbers of stitches that you use by 4
It should be done in order to use instead of one knitting needle four.
Step #8
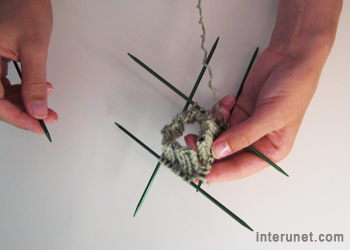
knit in the round about 6 rows down with four double pointed needles
Once you separated your stitches and created a square with knitting needles you won’t have any wrong side anymore. You need to knit only the right one.
Step #9
make a heel
Divide all your stitches by two or use the stitches from two needles and knit them on one needle. Now you will work again the right and wrong side. So, on the right side you slip the first stitch each time and knit all the rest, and on the wrong side you slip the first stitch and purl all the rest. You need to knit about 12 rows down or 1 ½ in.
Step #10
decrease numbers of stitches
In the given example were used 28 stitches (sts) in total. For the heel in particular were used 14 stitches and then this number were reduced to 6. To decrease numbers of stitches you need to knit two stitches together (k2tog) from both edges evenly till you have the desired amount of sts left.
Step #11
pick up stitches on both sides of the heel
This should be done to gain back again 28 stitches in total to knit in the round again. For that purpose you should simply insert each needle under the V-shaped edge stitches. (Some people like to make actually stitches by not only inserting the needle under the V-shaped edge stitches, but pull the yarn through each edge stitch. Either way will work fine.) After that you should have 28 sts on 4 dpn again and should knit the right side only.
Step #12
knit from the heel to toe
When you did your child’s feet measurements you need to knit a little bit more of that number because kids’ feet grow fast and you don’t want to fix your socks to your baby’s feet length often. Start to decrease stitches by knitting two stitches together from right and left side of the sock making even intervals between each decrease. The earlier you start to decrease the stitches the more round end of a sock you get. In the example the square like edges were desired.