
In order to reduce construction expenses home builders often use a “budget friendly” flooring option for stairs and in many cases it is a carpet. Also there are many older houses where stairs might require repair or replacement of flooring materials and hardwood is one of the best choices available even though not a cheapest.
First and most important thing should be cleared it is not a building the stairs and replacement carpet with hardwood does not require removal of a rough framing including stair stringers. Technically there are two options can be considered while deciding to install wood flooring on stairs
- use solid stair treads and solid stair risers
- use a hardwood strips whether prefinished or unfinished
Both options are possible for professional installer, but who is trying to figure out how to do it by self –solid treads and risers are the way to go because it is much easier to work with one piece which will cover a whole step or riser at a time. Other factor - try to avoid using unfinished hardwood strips or planks on stair riser. Sanding risers might be not the best idea if you do not have much of experience with operating wood floor edger. In this chapter we will explain how to install solid stair treads and solid stair risers.
Before you start make sure you have proper tools. By meaning proper think what you will cut and the quality you want to get. If you have 15 years old table saw with a blade where couple of teeth missing that is exactly how your stairs will be looks like if use such tool. Installation of a hardwood floor on stairs is a precise work and adequate approach.
 |
 |
 |
 |
 |
Tools required
Sawzall - for cutting out rough framing nosing under the carpet.
Table saw.
Miter saw – even though in most cities and villages codes allow making the steps 9” depth minimum in practice it is usually 10” – 11” what makes the stair tread hard to cut with a 10” blade if you want better quality work. For that reason it is better to a saw with a have 12” blade.
Nail gun and compressor.
Which nails to use?
18 gauge 2” nails will be the best option, but only if you will use glue properly.
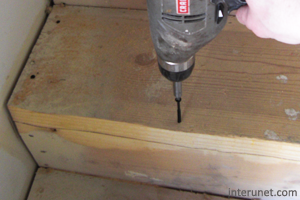
Drill - you might need to screw rough framing to eliminate possible squeaks overtime.
On the bigger landings it is better to use flooring air nailer or stapler.
Sander or wood floor edger if installing unfinished hardwood.
There are a also essential tools which are needed for nearly any home improvement project and if you looking online for a help whether you need tape measure, hammer, pencil, level, pliers, pry bar or square caliper you’d better find someone who will do hardwood floor on stairs for you.
Do not forget about safety and gloves along with safety glasses as much important as the rest of tools and materials.
Materials you need
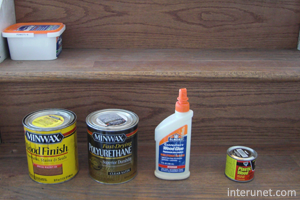
Besides stair treads and risers you will need a proper wood glue, wood filler, stain and finish if you will go with a unfinished hardwood. Also remember: you might need to level steps especially in older houses and usually there is not much you can do with a framing. For that matter have a wood shims ready.
Preparation
Before start on installation of hardwood the stairs should be properly prepared. It will include
- removing carpet, carpet pad, and all staples left
- cutting rough framing stair nosing
- screwing rough framing top boards to stair stringers
Installation instructions
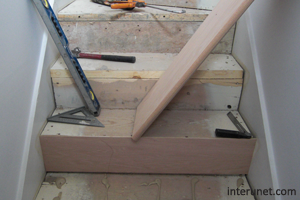
start installation from the bottom and move up
- Measure, cut and install stair riser. Always use glue and try not to put more than 2-4 nails in every riser.
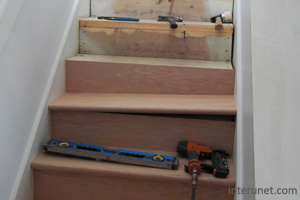
- Measure, cut and install stair thread. This is where you are leveling the stairs as well. Try to put 2 nails in each board – one on a side. Glue the tread to stairs and newly installed riser.
- Fill all holes left after nail gun with a wood filler and you are done if it is a prefinished wood.
- Sand unfinished wood.
- Apply stain if you wish.
- Apply finish.
Some tips
After installation try to avoid walking on the stairs while glue is not dry (usually it will be good to go next day.)
If you are staining the wood in darker colors try not to stain side boards or walls much. It might be hard to get rid of that stain later while painting.