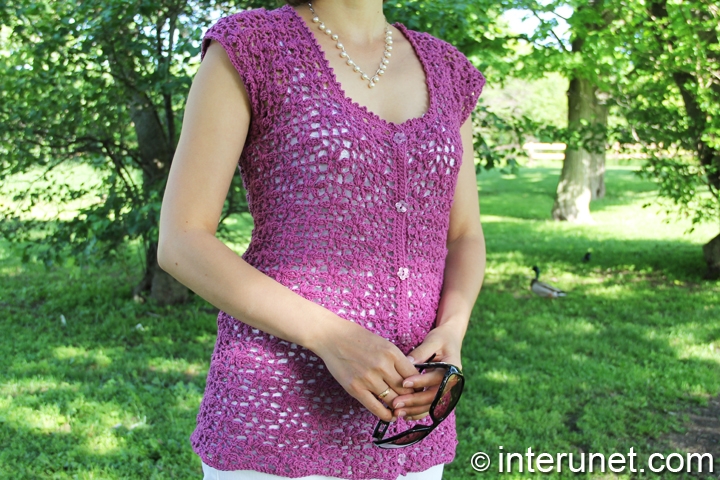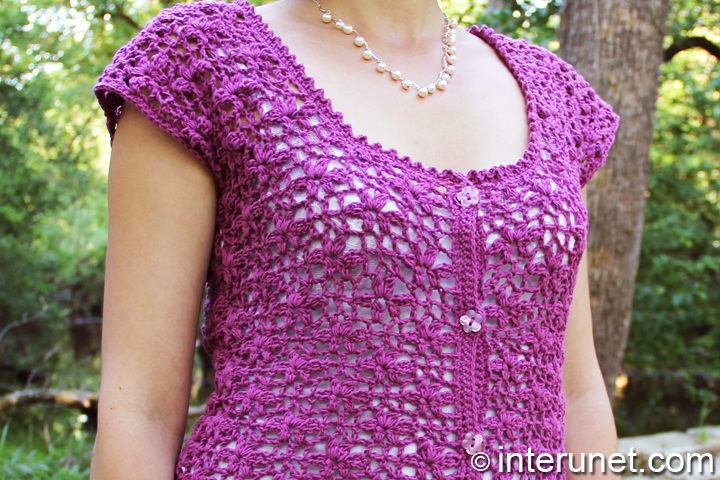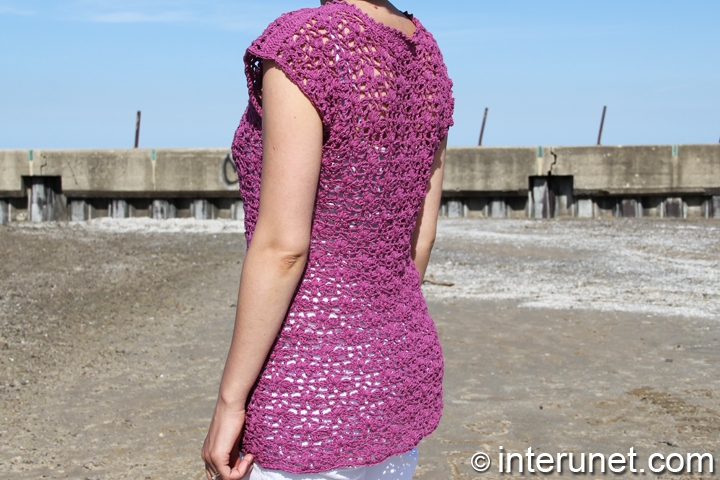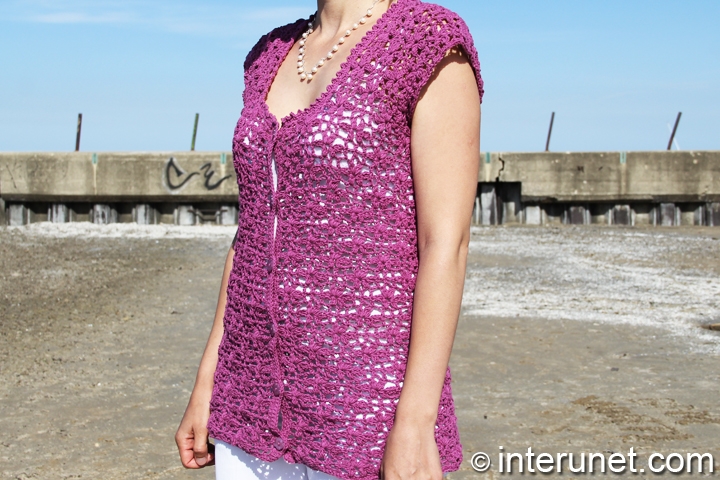
Yarn - Bernat Cotton-ish (color: COTTON GIN) / light 3 / 2.4 oz (70 g) / 282 yards (258 m) / 3.5 balls needed
Hook - F (3.75 mm) and 1 (2.75 mm) or other size hooks needed for the gauge
Gauge - About 1 flower (16 chains) in 3 inches
Blouse Size - US 6 - 8
Complexity - Intermediate

Women’s blouse crochet pattern – purple flower petal pattern
Step-by-step crochet instructions
Step 1
Make a foundation of 200 chain stitches or multiples of 16 chains plus 8 additional chains.
Step 2
Crochet the flower petals pattern for 40 rows. For the first 24 rows use the same size hook you started with, then for the following 8 rows use a smaller size hook, and for the last 8 rows use the larger size hook again. It is necessary to use a smaller size hook in order not increase and decrease chain stitches.
1st row – hook into 7th ch., dc1, [ch2, sk2, sc1, ch2, sk2, dc1, HP1, sk2, VP1, sk3, VP1, HP1, sk2, dc1] to end plus RC3
2nd row – [ch2, sk HP, VP1, ch3, VP1, ch2, sk HP, dc1, ch2, sk2, sc1, ch2, sk2 dc1] to last 2 chs; ch1, sk1, dc1 + RC3
3rd row – HP1, hook into 7th ch., VP1, sk3, VP1, HP1, sk2, dc1, ch2, sk2, sc1, ch2, sk2, dc1, [HP1, sk2, VP1, sk3, VP1, HP1, sk2, dc1, ch2, sk2, sc1, ch2, sk2, dc1] to last 2 chs; ch1, sk1, dc1 + RC4
4th row –hook into 7th ch., dc1, [ch2, sk2, sc1, ch2, sk2, dc1, ch2, sk HP, VP1, ch3, VP1, ch2, sk HP, dc1] to end + RC4
Repeat the pattern starting from the 1st row.
Step 3
Front part
(use ¼ of the total number of chain stitches or 3 flowers)
Continue the pattern for 3 flowers (bearing in mind that the pattern requires multiples of 16 chains). At the end of the 1st row, reuse the base chain of the second VP to work the very last dc1. It is important to do so because that way will be easier to start the back part. Lastly, work RC3 as usual and proceed the pattern for 2 flowers (on 2/3 ch. sts of the front part) for the 2nd row. You should have 40 chains ([2 x 16] + 8) in total.
Work the 40 chains up for 12 more rows or form 7 flowers in total. For the last 15th row of the front part, work sc to end.
Step 4
Cut the yarn and secure it or work sl.sts down to the 40th row.
Step 5
Back part
Continue the pattern for 6 flowers or 2/4 of the initial total number of chain stitches for 12 rows.
Step 6
Back shoulder piece
Crochet the pattern on 2 flowers for 2 rows (the 13th and 14th rows) on 2 flowers.
For the last 15th row of the first shoulder piece, work sc to end.
Step 7
Work sl.sts for the 15th row down to 12th row of the back part and continue sc to last 2 flowers of the row to crochet the second shoulder pieces. In other words, work the pattern on last 2 flowers of the 13th row. Then proceed the pattern for the 14th row as usual and for the 15th row – sc to end.
Step 8
Second front part
Work the 2nd part as the 1st one, but attach the yarn from the left side of the garment and not from the back part side. Work the pattern on the 3 remaining flowers and on the wrong side first. Then work the pattern on the 2 flowers for 13 rows more. The last 15th row – sc to end.
Step 9
Join shoulder pieces together from the wrong side.
Work sc for the armhole edges.
Step 10
Buttons
Attach the yarn from the top of the garment near the neck point and from the side where you plan to sew the buttons. Work sc to the bottom of the garment (to the foundation chain), then add RC1, and come back up with sc to the top of the blouse again + RC1. Lastly, work sc down and all the way around to the other 1st row of the front part (neck point).
Step 11
Buttonholes
Decide what intervals between each buttonhole will be. To do so, you need to count your total number of chains from the top of the garment (41st row) down to the initial foundation chain and divide it by a number of buttons you have.
In my case, the intervals between each buttonhole will be 15 chains. When you turn the garment to the wrong side, work sc2, [ch2, sk2, sc15] to last several chains; sc to end plus RC1
Last time, work from the bottom of the garment to the top working sc1 in each chain and sc5 in each buttonhole.
Step 12
Neck
1st row – sc to end + RC1
2nd row – [sc2, ch2, sc1 on the 1st of those 2 chs] to end

Abbreviations
ch – chain
dc – double crochet
HP – horizontal petal – ch3, [yo, insert a crochet hook into the 1st ch. of the 3 initial chains, and pull the yarn through, yo and pull the yarn through first 2 stitches on the hook] repeat that twice. Last time yo and pull the yarn through the 3 remaining stitches on your hook.
RC – returning chain
sc – single crochet
sk – skip chain
sl.st. – slip stitch
VP – vertical petal or cluster– [yo, insert a hook into the base chain of the previous row, and pull the yarn through, yo, and pull the yarn through the 1st two sts on your hook] repeat 3 times. Lastly, yo and pull the yarn through the 4 remaining sts on the hook.
yo – yarn over

Crochet a women's button up lace blouse

Comments
DESEARÍA CONTAR CON
DESEARÍA CONTAR CON INSTRUCCIONES DE TEJIDOS EN ESPAÑOL, GRACIAS POR SUS ATENCIONES
Beautiful. On my list
Beautiful. On my list
Hi Gustavo,
Hi Gustavo,
I'm glad that you liked the pattern. Happy crochet!
Hi mam
Hi mam
Loved all ur patterns.
I want to know how much foundation chain shldd i make for medium size
Hi Pranita Rai,
Hi Pranita Rai,
If your gauge will be about the same as mine, then you may follow the pattern exactly. Happy crochet!
Hi sana,
Hi sana,
I want to know how much foundation chain should i make for us8-10 size
Hi eli,
Hi eli,
For the size 8, you may follow the pattern exactly if your gauge will be about the same as mine. For the size 10, you may use a larger size crochet hook or slightly thicker yarn to adjust your gauge/tension. I would strongly advise you to practice your gauge before starting any crochet project. Happy crochet!
Hi Mam, how many foundation
Hi Mam, how many foundation chain should i make for XL size?
Hi Julietthomas2107,
Hi Julietthomas2107,
For the size XL, I would make a foundation chain of 232 chs or (14 x 16 + 8). Then I would work the pattern the same way, but skip 1 repeat under each arm. Happy crochet!